How do you capture the entire façade of an imposing building on a narrow street in the heart of a city like Paris?
To answer this question, in this tutorial I’ll show you an advanced technique for creating an architectural panorama from multiple viewpoints.
The Centre Pompidou
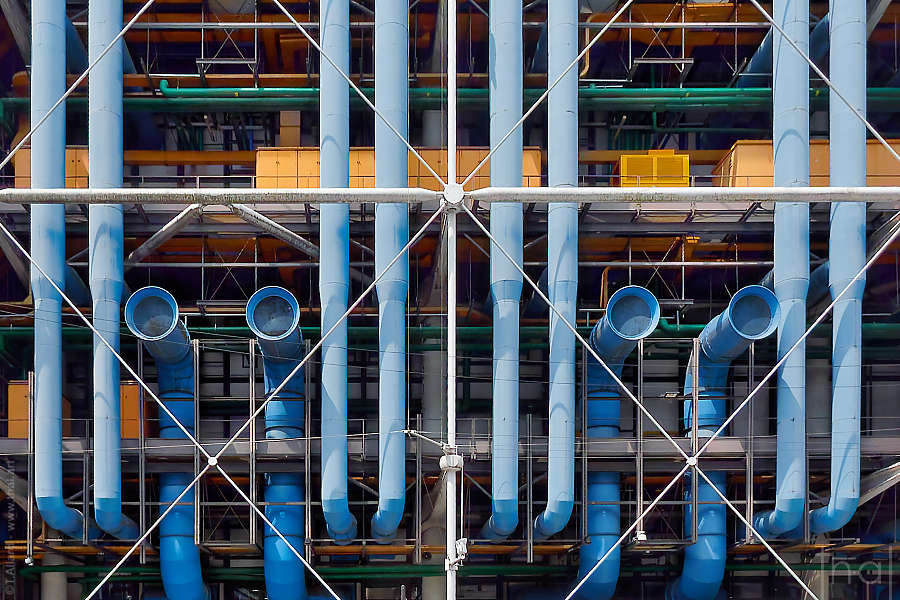
Clouds are gathering over Pompidou Center (closed for renovation until 2030), whose conceptual architecture has been the subject of much aesthetic criticism since its creation, due to its technical elements being transferred to the exterior.
At the rear of the building, a multitude of pipes are colored according to the type of flow – air, water, electricity – that passes through them.
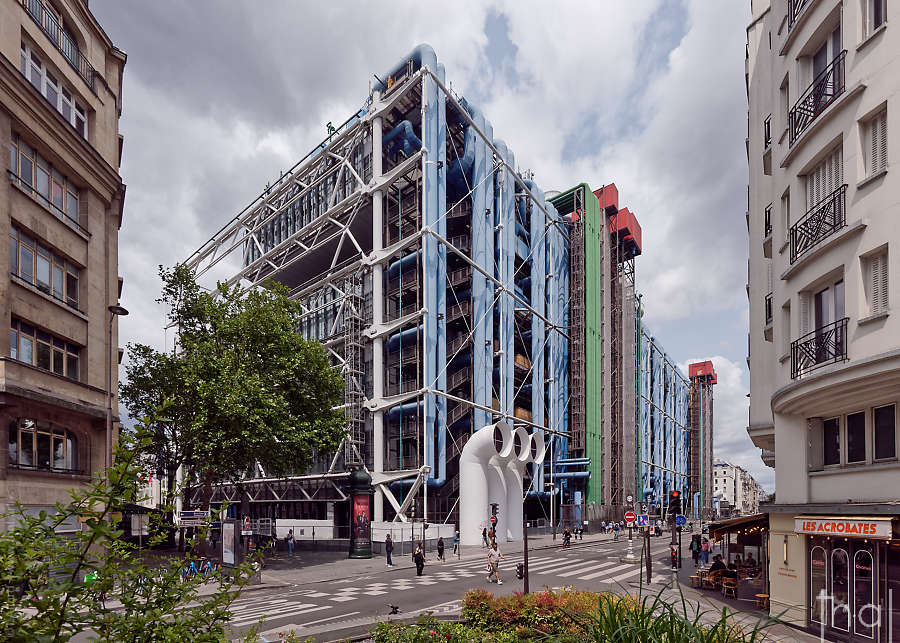
The short distance (around 20 m) left by Rue Beaubourg to photograph the rear of the Centre Pompidou (166 m long and 42 m high) theoretically precludes any frontal photographic representation of the building as a whole.
This is where a photographic technique, combined with photo editing, comes into play, restoring a massive architecture set in an urban fabric.
Program shots for an architectural panorama in the city
More than for any other architectural photography session, it’s important to be well prepared:
- By physically locating the site (satellite views or Google View do not allow you to anticipate unforeseen events such as construction work).
- By choosing a day with less car and/or pedestrian traffic, such as a Sunday or public holiday.
- By choosing the best exposure time for the building, using a specialized application such as PhotoPills on iOs.
- Make sure the light is constant (avoid cloudy skies), as the aim is to produce a series of homogeneous images over a period of several minutes.
The “linear” photography technique for composing an architectural panorama
Basic principles
Equipped with a wide-angle or ultra-wide-angle lens, you can take a series of photographs for post-production.
In vertical mode, you’ll have more of the ground and sky, which will be useful for photo editing.
The principle is to move parallel to the building to be photographed, at a fixed distance, and take frontal images at regular intervals: for our example of the Centre Pompidou in Paris, approximately every 7 meters*.
To do this, it’s handy to walk along the edge of a sidewalk or the wall of a building, taking care to stay on the same line, even if you’re crossing a street or an open space.
*The closer you are to the building, the shorter the distance between shots: see Tip 1 below.
It’s important to always include corner images at both ends of the building (without seeing its perpendicular facades).
This also applies to any part of a building that moves forward several meters: the aim is to be able to eliminate protruding perspectives during photo editing.
10 essential tips for creating an architectural panorama from multiple viewpoints
Following a rigorous “line of conduct” when shooting makes the photo editing work for the panoramic (a little) easier:
- To determine the maximum spacing between shots, you can count the number of steps (or meters) separating you from the building to be photographed and divide this measurement by 3.
- Be sure to start and finish with photographs aligned on each corner of the building (including any angular projections on the façade).
- Maintain your distance line and always move parallel to the building being photographed.
- Set the same framing height for all photos, using a horizontal marker in your viewfinder, to compose each image according to the same characteristics (a tripod can be a great help here).
- Respect the 3 axes when positioning your camera, as explained in my tutorial on perspective correction.
- For better control of the perpendicularity of the shooting axis, by rotating your camera on the vertical axis, you can visually check that the top of the building is parallel to the top edge of your viewfinder (see illustration below).
- Manual focusing, identical for all images, avoids slight variations in autofocus.
- Fixed exposure and white balance settings ensure greater consistency between all images.
- Double each photograph a few seconds apart, to avoid blurring or unwanted elements that could compromise the final panoramic assembly.
- As far as possible, avoid people, street furniture or vehicles in the foreground.
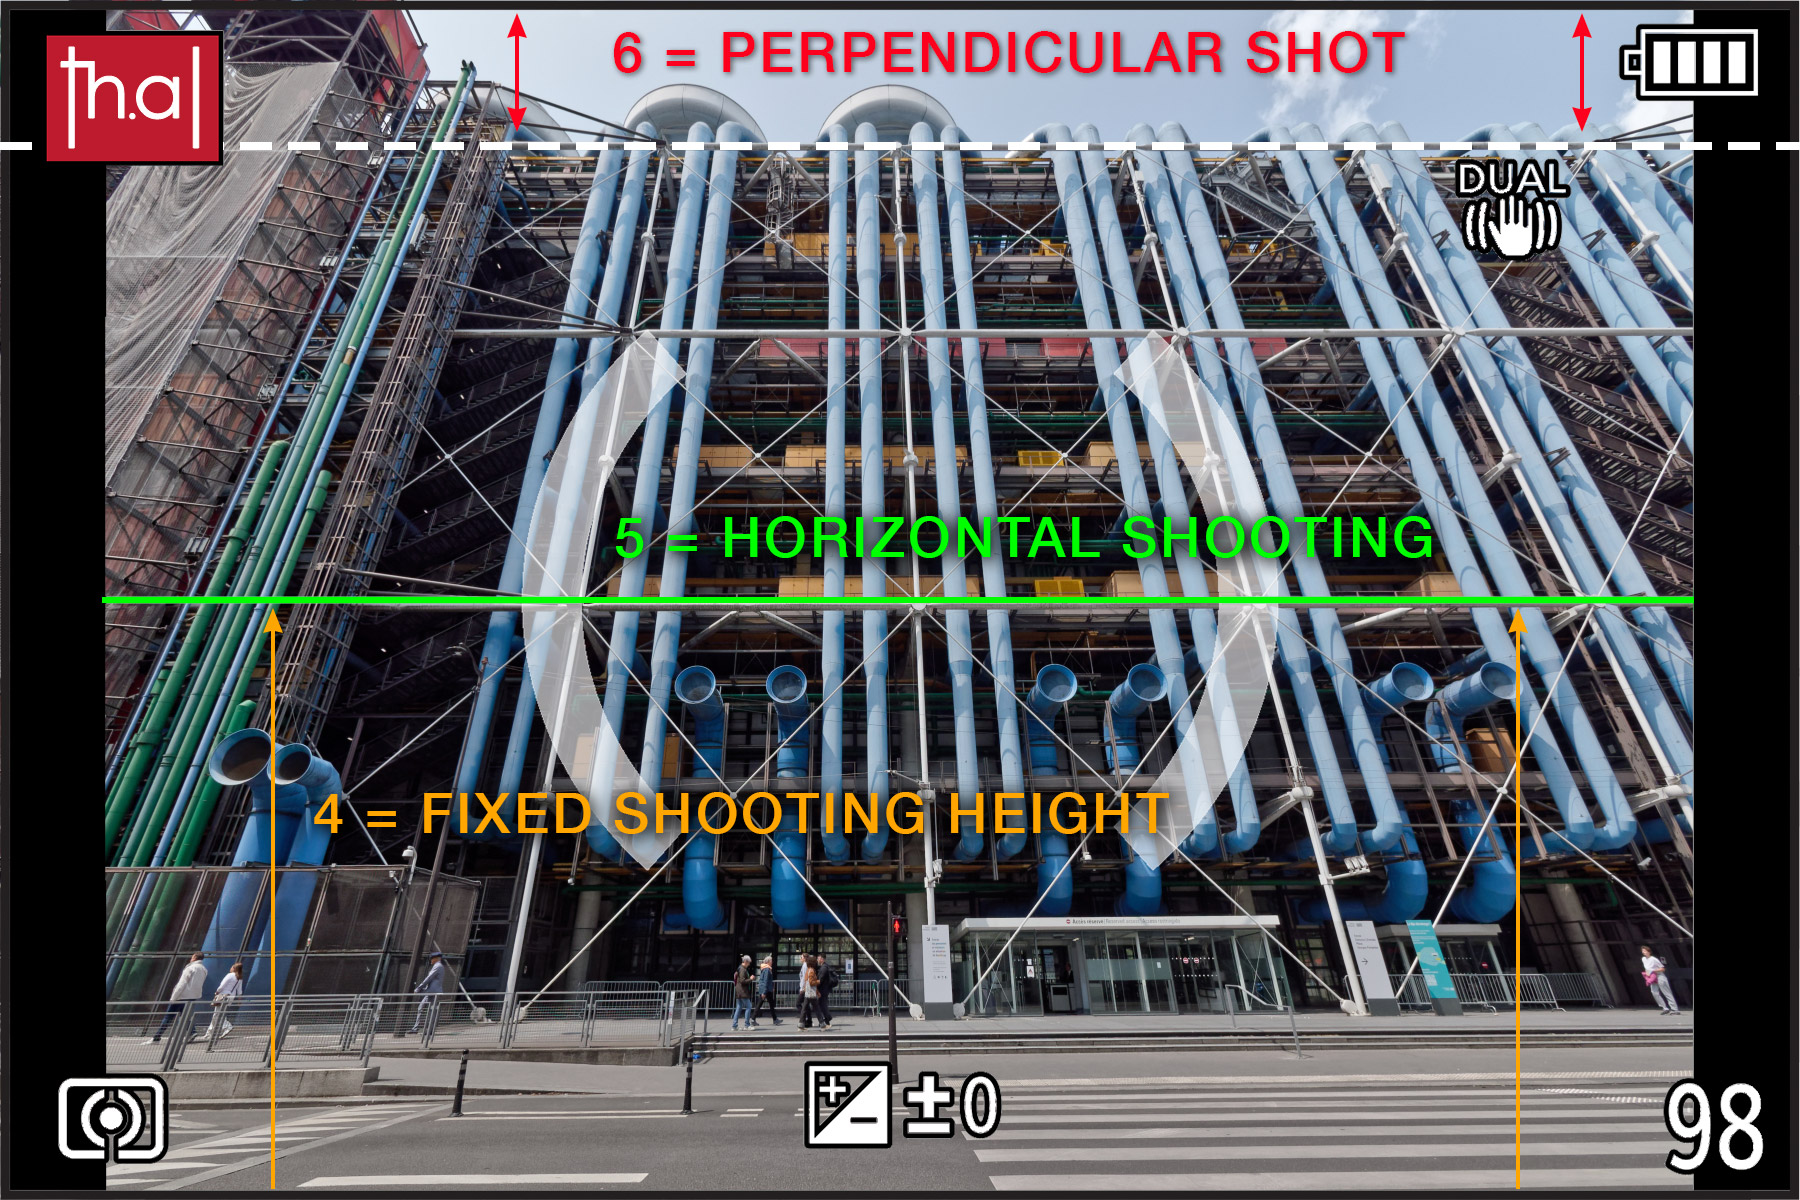
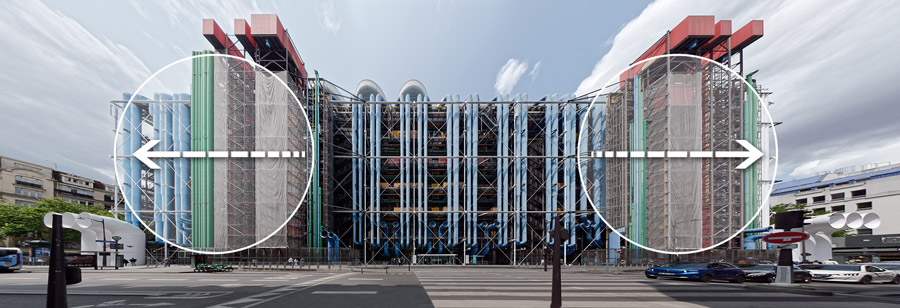
Tips 4, 5 and 6 are summed up in this image: once the view has been set horizontally and vertically using the camera’s central level, you can ensure that the shot is perpendicular by using the top edge of your viewfinder (or screen) to ensure that the top of the building is parallel.
A highly technical photo montage
The Centre Pompidou, with its tubular structure spanning several planes and axes – vertical, horizontal and oblique – makes assembling the photos more complicated than for other buildings with less busy facades.
Vertical plane treatment
Once each image has been straightened to perfection, the photo-montage process begins by isolating its central part (the area least subject to perspective effects).

Then you have to assemble them, a bit like piano keys, but with a few extra subtleties!
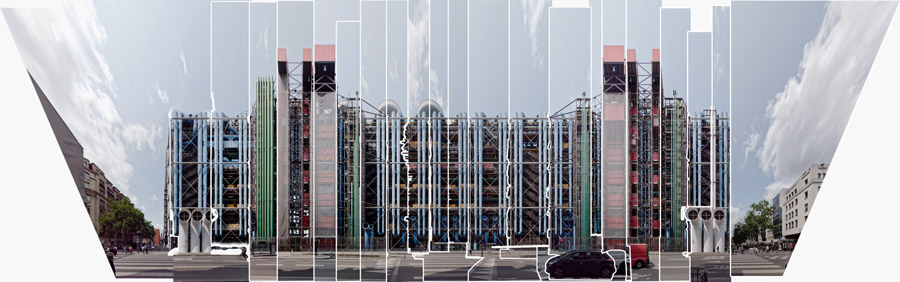
For the rear façade of the Centre Pompidou (also known locally as Beaubourg), the main constraint when assembling certain photos was the oblique metal crosspieces, which left only one solution: to join the images at the level of the vertical structures supporting them.
Other difficulties encountered with the vertical photo montage could have been avoided (if I had provided additional images):
1. The upper parts of the building overhangs (in red) had to be rectified: for a better result, 8 to 12 additional angle shots would have been needed for these 6 elements alone.
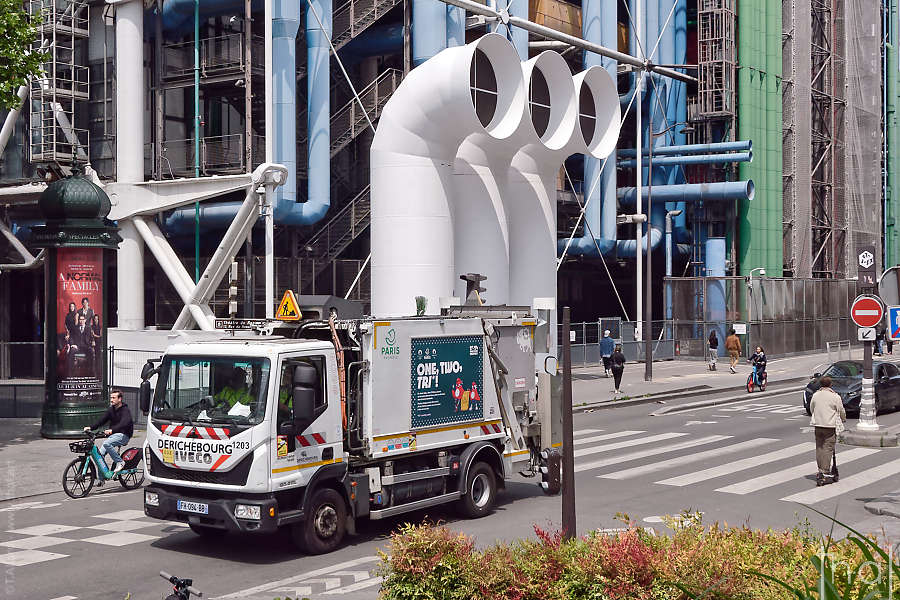
2. The three white tubes on the sidewalk on either side of the building are difficult to assemble from two images spaced 7 m apart: as they are round, it would have been sufficient to photograph each one centered.
In the final montage, they have been processed from the 2 corner photos, thus retaining their perspective effect.
Re-creation of the horizontal plane
The greatest complexity of the photo montage lies in the recomposition of the horizontal plane: with dozens of images taken just a few meters apart, the annihilation of so many different angles of perspective on the ground becomes a real headache.
Anticipated foregrounds = easier editing
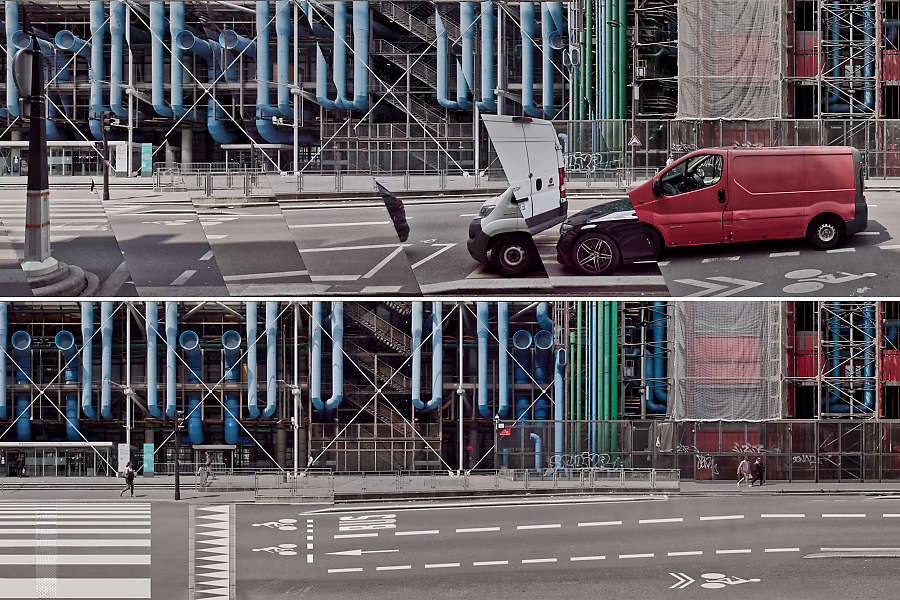
While it was easy enough to make the street furniture poles in the foreground disappear by moving a few centimetres when the shots were taken, the problem with parked vehicles is quite different, as they can obscure the street and the bottom of the building.
To make up for this lack of photographic material, we had to drive past these cars to take a few additional photographs.
These additional images are essential for the montage, if these unwanted objects are to disappear.
Recomposing the background
Assembling the sky above the building, or replacing it if clouds appear distorted, requires manual trimming (a task that could have been entrusted to artificial intelligence if the upper part of our Centre Pompidou façade wasn’t made up of so many small metal uprights).
In the case of a recomposed panoramic view, as shown here for a single building, you can choose to retain the perspective effect of the streets and buildings on either side.
The recomposed architectural panorama of the Centre Pompidou’s rear façade
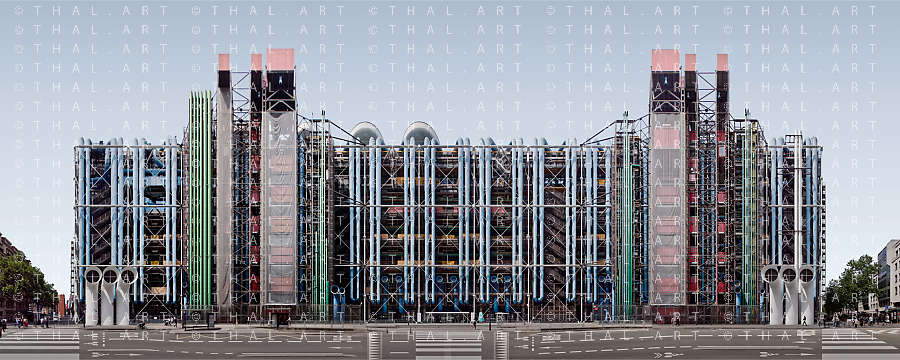
This image, showing the entire rear façade of Beaubourg as seen from the ground, is probably the only one of its kind in the world, although there are a few floor shots that come close.
Note: having taken 3 days to complete, the image is watermarked and is not free to use, as are all the images published on this blog.
With the technique described in this tutorial, I could have continued well beyond the building, if that had been of interest, as I’ve already done for rue Crémieux in Paris rue Crémieux in Paris or other streets in Lyon, France: see other examples of architectural panoramas on my (french) site.
Photographs and texts: Thierry Allard, all rights reserved.
External links to this article are welcome, but please respect copyright and do not use text extracts or images without first requesting permission.
And a panoramic view of Beaubourg from a single vantage point?
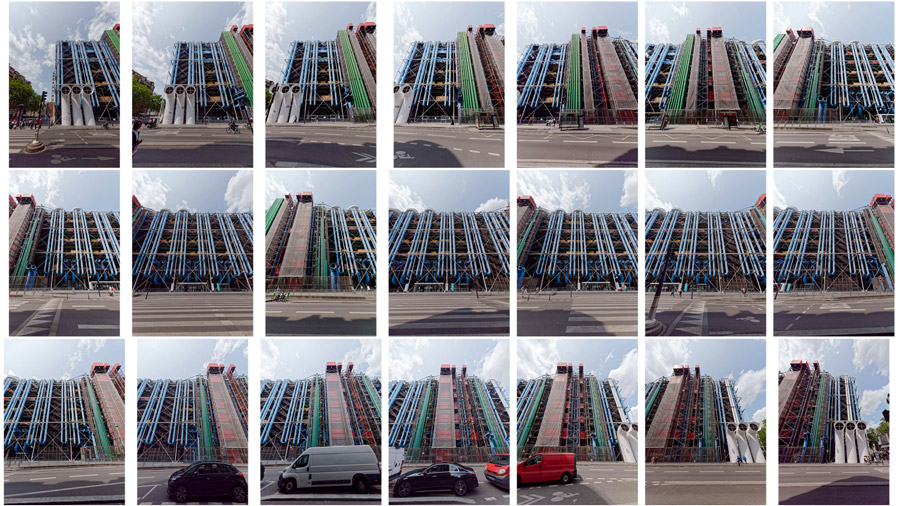
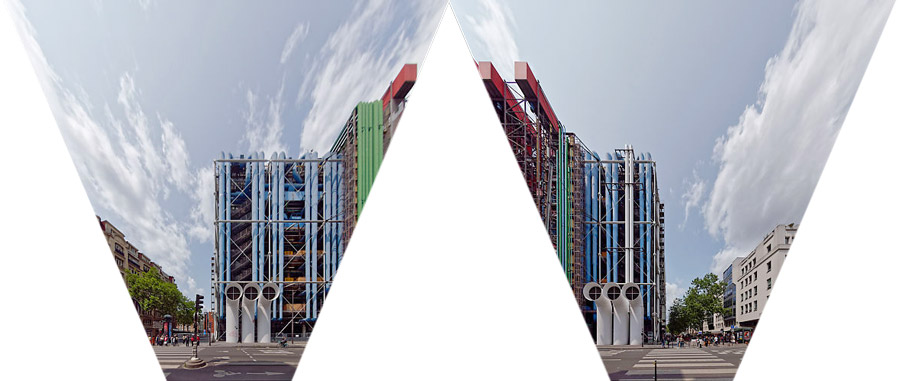
The classic procedure for producing a photographic panorama from a single point of view is not feasible with so little distance between the images.
To demonstrate this, here’s the result that can be obtained with 3 images taken from the same point of view.
I take advantage of Rue Simon Le Franc, which is almost opposite the central service entrance, to reduce the view as much as possible…
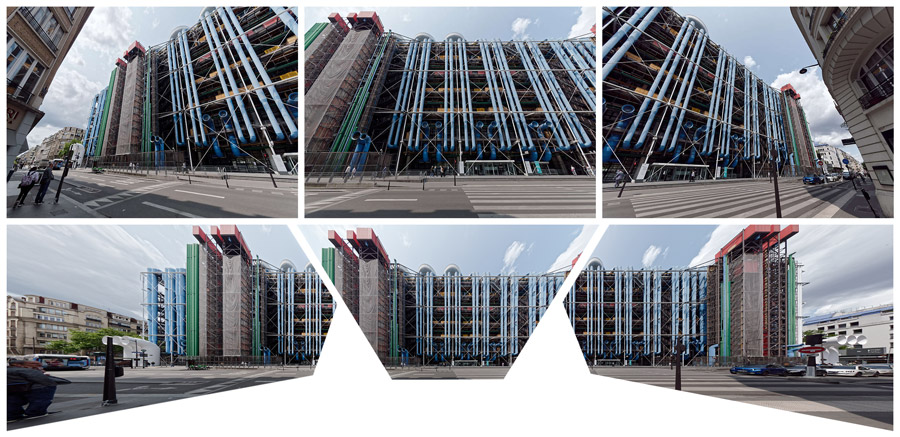
After straightening the 3 images, it’s fairly easy to assemble them, but the result isn’t very convincing.
Here, the deformations of the tubes, the overhangs, the buildings and the ground, as soon as you move away from the central part, make it impossible to correct them realistically.


Pingback: How to protect yourself against the theft of your images on the Internet